Every time I make Matilda chocolate cake, I think about that scene. You know the one. Bruce Bogtrotter sitting in front of that enormous, glossy, ridiculous chocolate cake while the entire school watches. It's dramatic and over the top and honestly the most iconic cake moment in movie history. And the thing is, that cake looks genuinely delicious. So I spent a lot of time figuring out how to actually bake something worthy of that scene at home, and friends, I think I finally nailed it.
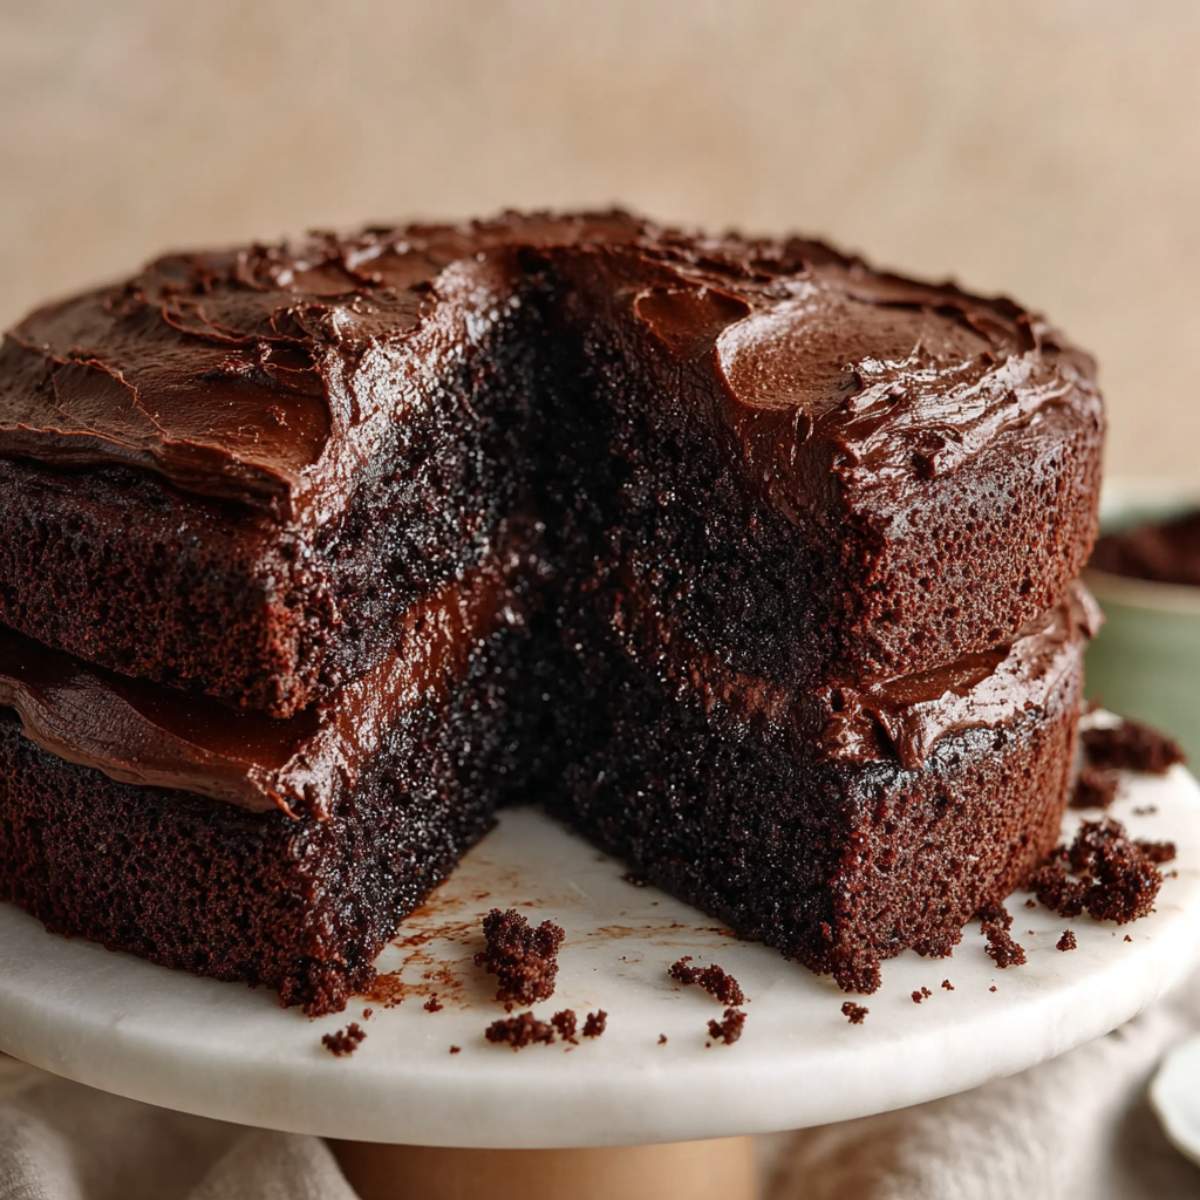
This recipe comes out every time someone in our house has a birthday, a bad week, or a reason to celebrate. Three layers of this deeply moist Matilda chocolate cake stacked high with a silky smooth chocolate fudge frosting that goes on like a dream and tastes like pure chocolate heaven. Olivia calls it "the movie cake" and refuses to let me make any other chocolate cake for her birthday. At this point it's basically a family law.
Jump to:
- Why You'll Love This Matilda Chocolate Cake
- Ingredients for Matilda Chocolate Cake
- How to Make Matilda Chocolate Cake
- My Top Tips for Matilda Chocolate Cake
- Little Moments in the Kitchen
- Substitutions for Matilda Chocolate Cake
- Variations on Matilda Chocolate Cake
- Equipment for Matilda Chocolate Cake
- Storage Tips for Matilda Chocolate Cake
- Olivia's Tip for Matilda Chocolate Cake
- FAQ about Matilda Chocolate Cake
- Conclusion
- Related
- Pairing
- 📖 Recipe
Why You'll Love This Matilda Chocolate Cake
- It's showstopper gorgeous with very doable effort. Three layers sounds intimidating but each layer is simple to make, and the fudge frosting goes on so smoothly it looks professional even on your first try.
- The most moist, fudgy crumb you've ever had. This Matilda chocolate cake batter uses hot coffee and oil together for a crumb that stays soft for days. Using hot brewed coffee to bloom the cocoa powder and oil in the batter gives you that dense, bakery-style crumb that stays moist for days. This is not a dry cake. Not even a little.
- Made entirely from scratch with pantry staples. No box mix, no special trips to the store. Everything you need for this Matilda chocolate cake is probably already sitting in your kitchen right now.
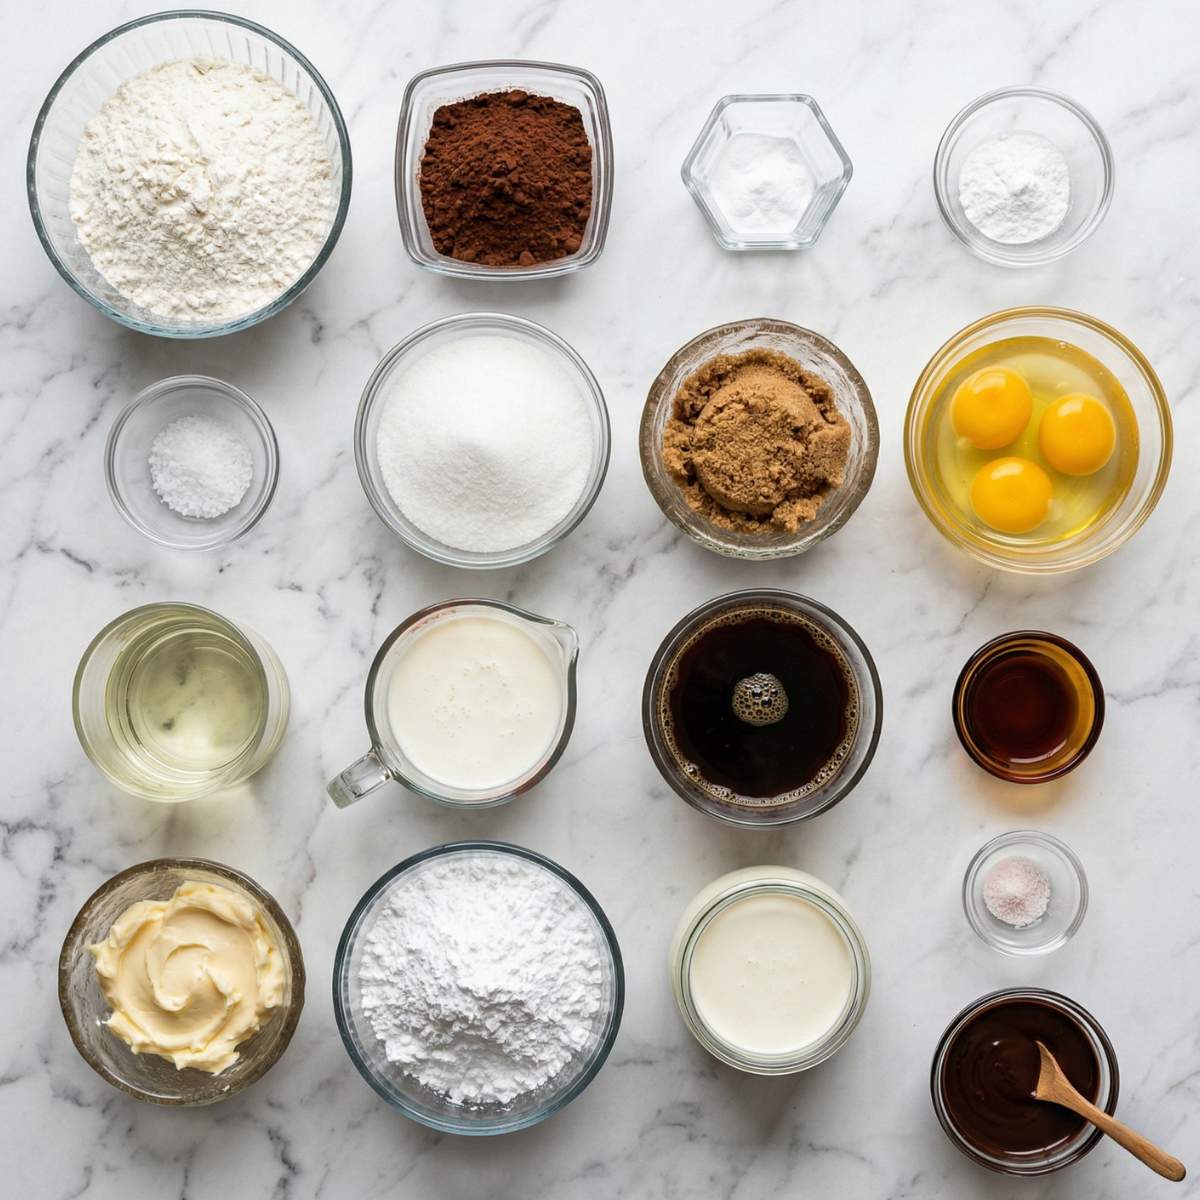
Ingredients for Matilda Chocolate Cake
You really don't need anything exotic to make this cake. Just solid, real ingredients that work together to build serious chocolate flavor from the ground up. Let me walk you through what goes into each part.
What You'll Need
For the Chocolate Cake Layers (makes three 8-inch layers):
- 2 cups (250g) all-purpose flour
- ¾ cup (75g) unsweetened cocoa powder
- 2 teaspoons baking soda
- 1 teaspoon baking powder
- 1 teaspoon salt
- 1 ½ cups (300g) granulated sugar
- ½ cup (100g) brown sugar, packed
- 3 large eggs, room temperature
- 1 cup (240ml) vegetable oil
- 1 cup (240ml) buttermilk, room temperature
- 1 cup (240ml) hot brewed coffee (or hot water)
- 2 teaspoons vanilla extract
For the Chocolate Fudge Frosting:
- 1 cup (225g) unsalted butter, softened
- ¾ cup (75g) unsweetened cocoa powder
- 4 cups (480g) powdered sugar
- ½ cup (120ml) heavy cream, plus more as needed
- 2 teaspoons vanilla extract
- Pinch of salt
- 4 oz (115g) semi-sweet chocolate, melted and cooled
Why These Ingredients Matter
- Hot brewed coffee instead of plain hot water. Coffee does not make your cake taste like coffee, I promise. What it does is intensify and deepen the cocoa powder's flavor so dramatically that your cake goes from "tastes like chocolate" to "tastes like the best chocolate cake you've ever had." This is the single most important trick in making a great Matilda chocolate cake from scratch.
- Oil over butter in the batter. Butter has a beautiful flavor, but it solidifies at room temperature and makes a cake denser and drier as it cools. Oil stays liquid, which means your moist chocolate cake layers stay soft and almost fudgy even on day two or three. For a cake this layered and tall, you want that staying power.
- Melted semi-sweet chocolate in the frosting. Most fudge frostings use only cocoa powder, which is great. But adding melted chocolate into the mix gives the frosting that glossy, silky, thick consistency that you see in the Matilda movie cake scene. It makes the frosting spreadable, shiny, and genuinely fudgy rather than just sweet and powdery.
How to Make Matilda Chocolate Cake
Step-by-Step Directions
1. Preheat your oven and prep your pans. Preheat your oven to 350°F (175°C). Grease three 8-inch round cake pans generously, line the bottoms with parchment paper circles, and grease the parchment too. This is a sticky, rich batter and you want these layers to come out clean every time, Getting your pans ready properly is the first step to a tall, clean Matilda chocolate cake that unmolds perfectly.
2. Bloom the cocoa with hot coffee. In a heatproof measuring cup or small bowl, whisk the ¾ cup of unsweetened cocoa powder into 1 cup of hot brewed coffee until completely smooth and glossy. Set it aside to cool slightly while you work on the rest. The mixture will smell absolutely incredible and turn almost syrupy.
3. Mix your dry ingredients. In a large bowl, whisk together the 2 cups of flour, baking soda, baking powder, and salt until evenly combined with no lumps.
4. Combine the wet ingredients. In a separate large bowl, whisk together both sugars, 3 eggs, 1 cup of oil, 1 cup of buttermilk, and 2 teaspoons of vanilla extract until smooth and glossy, about 1 minute by hand. Pour in your cooled cocoa-coffee mixture and whisk again until the batter is deep brown and silky.
5. Bring the batter together. Pour the wet ingredients into the dry ingredients and fold gently with a rubber spatula until just combined and no streaks of flour remain. The batter will be thinner than you expect, almost pourable. That's exactly right. Do not overmix or your layers will be tough instead of tender.
6. Divide and bake. Divide the batter as evenly as possible between your three prepared pans. Bake at 350°F for 28 to 35 minutes, until a toothpick inserted in the center comes out with just a few moist crumbs and the tops spring back lightly when touched. They should smell deeply chocolatey and look set and slightly domed. This is what the inside of a perfect Matilda chocolate cake looks like before frosting.
7. Cool the layers completely. Let the cakes cool in their pans for 15 minutes, then run a butter knife around the edges and turn them out onto wire racks to cool completely. This takes at least 1 to 2 hours. Do not rush this step. Frosting warm cake layers causes them to slide and the frosting to melt into the crumb.
8. Make the silky fudge frosting. Beat 1 cup of softened butter on medium speed until pale and fluffy, about 3 minutes. Add the ¾ cup of cocoa powder and beat again until combined. Add the 4 oz of melted, cooled semi-sweet chocolate and mix on low until incorporated. Add the 4 cups of powdered sugar in two additions, alternating with the ½ cup of heavy cream, mixing on low between each. Add the 2 teaspoons of vanilla and the pinch of salt, then beat on medium-high for 2 minutes until the frosting is thick, glossy, and smooth. If it looks too stiff, add cream one teaspoon at a time until it's perfectly spreadable.
9. Stack, frost, and serve. Place your first cake layer on a serving plate or cake board. Spread a generous layer of fudge frosting on top, all the way to the edges. Add the second layer, press gently, and frost again. Place the third layer on top and frost the entire outside of the cake, starting with a thin crumb coat, chilling for 20 minutes in the fridge, then finishing with a thick, smooth final layer of frosting. Slice tall and serve proudly.
Hint: Always do a crumb coat before your final frosting layer. This is a thin, barely-there coat of frosting that seals all the loose crumbs to the cake so your final layer goes on perfectly clean and smooth. Chill it for 20 minutes, then frost. It makes a massive difference in how the finished cake looks.
My Top Tips for Matilda Chocolate Cake
The biggest mistake people make with a layered chocolate cake is skipping the leveling step. Once your layers are fully cooled, use a long serrated knife to slice off any domed tops so each layer sits perfectly flat. Stacking uneven layers causes the cake to lean and the frosting to shift. Two minutes of leveling makes your Matilda chocolate cake look bakery-perfect every single time.
Gold Tip: Chill your cake layers in the freezer for 20 minutes before stacking and frosting. Slightly cold layers are firmer and much easier to work with. They won't crumble, they won't shift, and the frosting grips them beautifully. This trick changed my cake game completely.
If you love baking rich chocolate desserts like this one, my Espresso Brownies use the same coffee-plus-chocolate flavor technique and they are absolutely worth adding to your baking list.
Little Moments in the Kitchen
The first time Olivia saw me pulling three cake layers out of the oven, her eyes went huge and she immediately said, "Mom, are you making the Bruce cake?" She has watched Matilda so many times that she genuinely refers to this Matilda chocolate cake by the character's name, not the movie.. I told her yes, and she pulled a chair up to the counter and sat there for the full two hours of cooling time. Just watching. Waiting. Occasionally announcing how much longer she thought it needed.
When I finally handed her the first slice and she got a look at the layers and the thick, glossy frosting, she went completely quiet for about ten seconds. Then she looked up and said, very seriously, "I think Bruce was actually really lucky." Coming from an eleven-year-old who usually eats cake in three bites and asks for seconds, that counted as a five-star review.
Substitutions for Matilda Chocolate Cake
No buttermilk: Mix 1 tablespoon of white vinegar or lemon juice into 1 cup of whole milk. Let it sit for 5 minutes until slightly curdled, then use it as a direct swap.
No coffee: Hot water works in place of hot coffee. Add 1 teaspoon of instant espresso powder to the dry ingredients to keep the chocolate flavor bold.
Gluten-free: Use a 1:1 gluten-free all-purpose baking flour blend. The layers may bake slightly denser but the flavor stays just as rich.
Dairy-free: Swap buttermilk with oat milk plus 1 tablespoon vinegar, use dairy-free butter in the frosting, replace heavy cream with full-fat canned coconut cream, and use dairy-free dark chocolate.
Eggless: Use 2 tablespoons of ground flaxseed mixed with 6 tablespoons of water per egg. Let it rest for 5 minutes before adding to the batter. My Eggless Brownies have more helpful tips for eggless chocolate baking.
Variations on Matilda Chocolate Cake
Extra Fudgy Double Chocolate: Fold 1 cup of semi-sweet chocolate chips into the batter before dividing it between the pans. You get pockets of melted chocolate in every single layer, making the whole cake even richer and more indulgent.
Mocha Layer Cake: Double the coffee in the batter a sophisticated mocha profile that adults especially love. It's a beautiful spin on the classic Matilda chocolate cake base. and add 2 teaspoons of instant espresso powder directly into the frosting along with the cocoa. The coffee flavor becomes much more present, giving the whole cake a sophisticated mocha profile that adults especially love.
Kid-Friendly Sprinkle Cake: Keep the same Matilda chocolate cake recipe but press rainbow sprinkles all along the sides while the frosting is still slightly soft. Olivia also insists on adding a full cup of sprinkles between the layers. It's extra, colorful, and kids go completely wild for it. Check out my Chocolate Chip Banana Bread for more fun kid-friendly baking ideas.
Equipment for Matilda Chocolate Cake

Three 8-inch round cake pans: This recipe is built for 8-inch pans. Using 9-inch pans gives thinner layers that bake faster, so start checking at the 25-minute mark. Using 6-inch pans creates taller layers with longer bake times.
Wire cooling racks: Cooling cakes flat on a rack lets air circulate underneath and prevents soggy bottoms. Cool layers in batches if you only have one rack.
Offset spatula: This tool makes frosting a tall layered cake look effortless. It gives you control over the angle and lets you smooth the sides cleanly without your knuckles dragging through the frosting.
Serrated knife for leveling: A long serrated bread knife is perfect for trimming domed tops flat. Use a gentle sawing motion and rotate the cake as you go for an even, clean cut.
Storage Tips for Matilda Chocolate Cake
- Room temperature: Store your frosted Matilda chocolate cake covered or under a cake dome for up to 2 days. The fudge frosting seals the layers and keeps them moist.
- Fridge: Store leftovers tightly wrapped or in an airtight container for up to 4 days. Let slices sit at room temperature for 20 to 30 minutes before eating for the softest texture.
- Freezing the layers (unfrosted): Wrap each cooled layer tightly in plastic wrap, then in foil, and freeze for up to 2 months. Thaw in the fridge overnight before stacking and frosting.
- Freezing frosted cake: The fudge frosting contains heavy cream and butter, so freezing the fully assembled cake can alter the frosting texture once thawed. Freeze plain layers only and make fresh frosting when ready to serve.
Olivia's Tip for Matilda Chocolate Cake
Olivia says: "Make sure the frosting goes all the way to the edge of every layer, not just the middle. That's where the best bites are." She is extremely serious about frosting coverage, and honestly, she is completely right.
FAQ about Matilda Chocolate Cake
Why is it called a Matilda cake?
The name comes from the 1996 film Matilda, based on Roald Dahl's beloved children's book. In one of the most iconic scenes, a boy named Bruce Bogtrotter is forced to eat an enormous chocolate cake in front of the whole school as a punishment, but ends up finishing the entire thing to a cheering crowd. The cake looked so rich and chocolatey that people have been trying to recreate it ever since. Home bakers and food bloggers now use "Matilda cake" to describe a deeply moist, tall, layered chocolate cake with thick fudge frosting that matches the drama of that scene.
What is the Matilda cake made of?
A true Matilda chocolate cake is a rich, moist, multi-layer chocolate cake made with unsweetened cocoa powder, hot coffee, oil, buttermilk, and topped with a thick, glossy chocolate fudge frosting. The key is that the frosting should be thick, smooth, and deeply chocolatey, not light or airy.
What makes a cake moist?
The biggest factors that keep a Matilda chocolate cake moist are using oil instead of butter, adding buttermilk for a tender crumb, and blooming the cocoa in hot liquid. Not overbaking is equally critical. Pull the cake when a toothpick shows just a few moist crumbs, not bone dry. My Chocolate Loaf Cake uses the same moisture techniques in a simpler, everyday format.
How long do you bake a Matilda cake?
At 350°F in standard 8-inch round pans, each layer bakes for 28 to 35 minutes. Start checking at 28 minutes by inserting a toothpick in the center. When it comes out with a few moist crumbs but no wet batter, they're done. Use the toothpick test rather than relying strictly on the timer.
Conclusion
This Matilda chocolate cake is everything a great chocolate cake should be: tall, fudgy, deeply chocolatey, and completely impossible to walk past without cutting yourself a slice. It's the recipe I'm most proud of on this blog, and the one Olivia has requested for three birthdays in a row. Once you make it, you'll completely understand why Bruce finished the whole thing.
Bake it for a birthday, a celebration, or a plain old weekend when everyone deserves something a little special. Keep the chocolate going with my Chocolate Loaf Cake for an easier everyday version, or check out this One Bowl Chocolate Cake from Allrecipes for a quick weeknight option. Now go make the movie cake. You've got this.
Related
Looking for other recipes like this? Try these:


Pairing
These are my favorite dishes to serve with Matilda Chocolate Cake:

📖 Recipe
Best Matilda Chocolate Cake with Silky Fudge Frosting
Ingredients
Equipment
Method
- I start by preheating the oven to 350°F (175°C). Olivia always volunteers to place the parchment circles into the pans. Grease all three pans generously so the cakes release cleanly.
- I whisk the unsweetened cocoa powder into the hot brewed coffee until smooth and glossy. Olivia loves watching it turn dark and syrupy, and the chocolate smell fills the kitchen.
- In a large bowl, I whisk together the all-purpose flour, baking soda, baking powder, and salt. I always tell Olivia this step helps the cake bake evenly.
- In another bowl, I whisk the granulated sugar, brown sugar, eggs, vegetable oil, buttermilk, and vanilla extract until smooth. Olivia cracks the eggs carefully and proudly.
- I pour the cocoa mixture into the wet ingredients, then gently fold everything into the dry bowl. The batter is thin, which Olivia always reminds me is how we get that fudgy texture.
- I divide the batter evenly between the pans and bake for 28 to 35 minutes, until the centers spring back lightly and smell deeply chocolatey.
- The cakes cool completely on wire racks. Olivia keeps watch so no one tries to frost too early.
- I beat the unsalted butter, then mix in cocoa powder, melted semi-sweet chocolate, powdered sugar, heavy cream, vanilla extract, and salt until thick, glossy, and smooth. Olivia taste-tests every time.
- I level the cake layers, stack them with frosting between each one, apply a crumb coat, chill, then finish frosting. Olivia insists the frosting reaches the edges, and she's absolutely right.

Leave a Reply