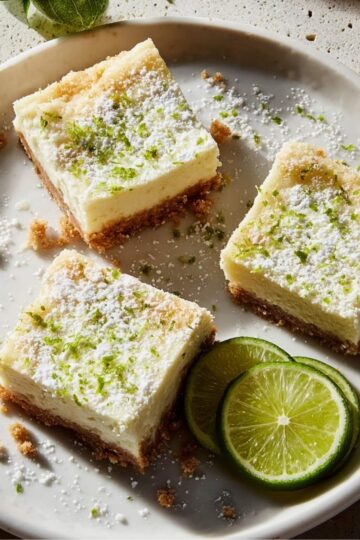
Eggnog pie recipe season in our house officially starts the moment the first carton of eggnog appears at the grocery store and Olivia spots it in the cart. We're talking a silky, creamy, holiday-spiced filling with that warm nutmeg and vanilla flavor everyone loves about eggnog, all sitting in a buttery graham cracker crust that takes about five minutes to press together. This eggnog pie recipe is completely no-bake, comes together in about 15 minutes, and is one of the most requested holiday desserts I make every single year.
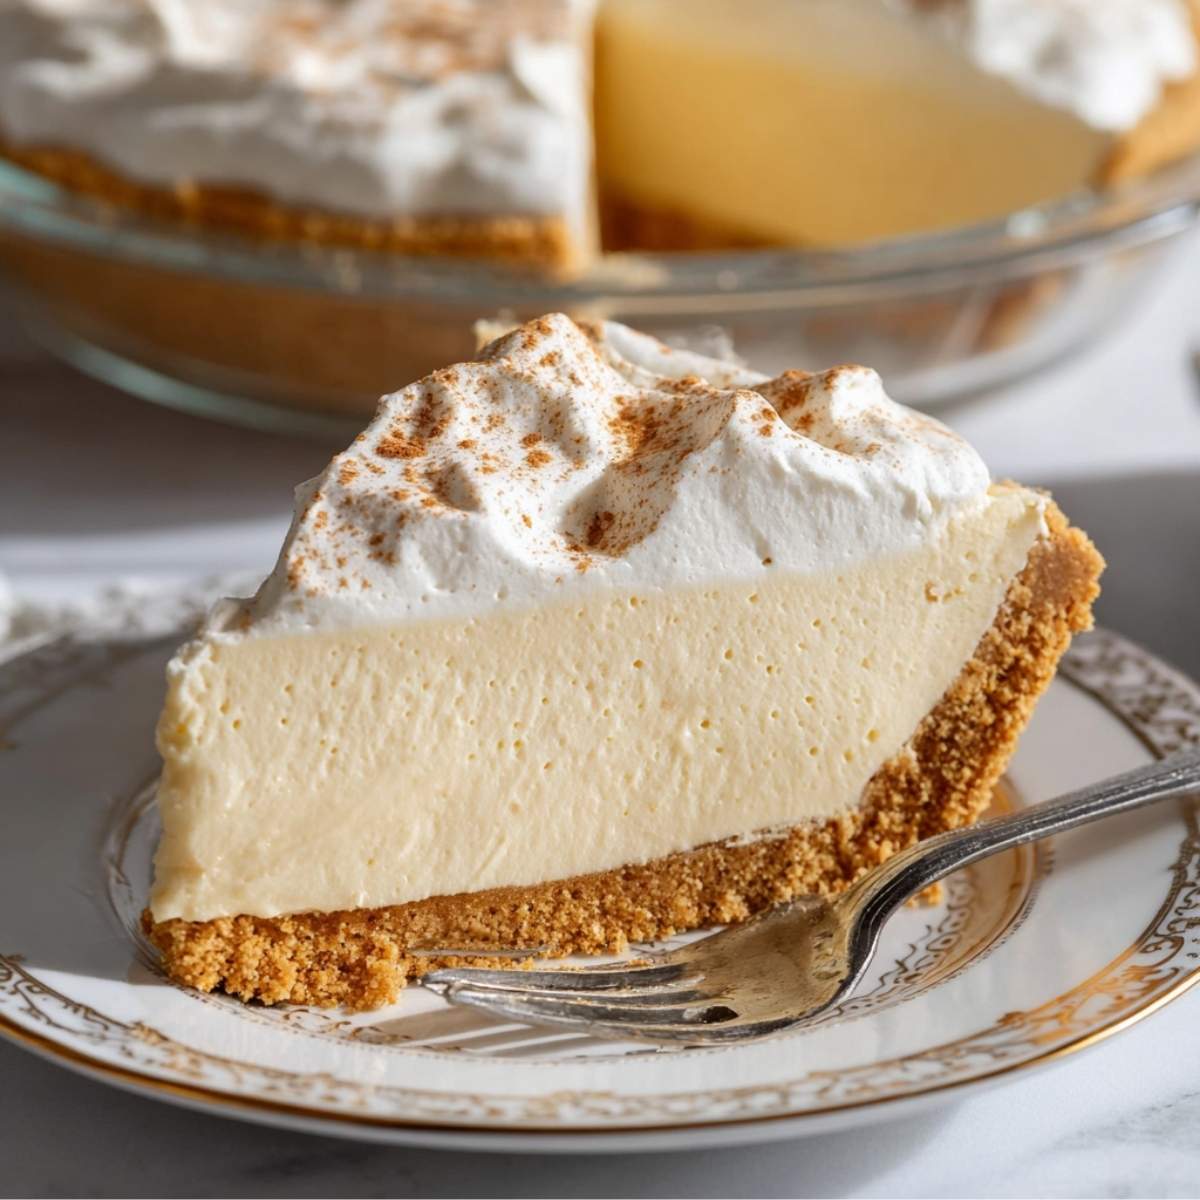
What makes this eggnog pie recipe the one I come back to every Christmas and Thanksgiving is how effortlessly impressive it is. Five simple ingredients, a quick mix, a few hours in the fridge, and you have a dessert that looks beautiful on a holiday table and tastes like you spent hours making it. It is the kind of recipe that makes you look like a very talented baker without any of the stress that usually comes with holiday dessert prep.
Jump to:
- Why You'll Love This Eggnog Pie Recipe
- Ingredients for Eggnog Pie Recipe
- How to Make Eggnog Pie Recipe
- My Top Tips For Eggnog Pie Recipe
- Substitutions for Eggnog Pie Recipe
- Variations on Eggnog Pie Recipe
- Equipment For Eggnog Pie Recipe
- Storage Tips for Eggnog Pie Recipe
- Olivia's Tip for Eggnog Pie Recipe
- FAQ About Eggnog Pie Recipe
- Conclusion
- Related
- Pairing
- 📖 Recipe
Why You'll Love This Eggnog Pie Recipe
- It is a 5-ingredient easy pie that takes just 15 minutes to put together. This is the dessert you make when the oven is already full of the main course and you still need something stunning for the dessert table. No baking, no tempering eggs, no complicated custard technique. Just mix, pour, and chill.
- It is the perfect make-ahead holiday dessert. This eggnog pie recipe needs to chill for at least 4 hours before serving, which means you can make it the night before Thanksgiving or Christmas dinner and have one less thing to think about on the day itself. It keeps beautifully in the fridge and the flavor genuinely blooms overnight.
- It tastes exactly like the holidays. The combination of real eggnog, warm nutmeg, and creamy whipped topping in a graham cracker crust is one of those flavors that instantly makes everyone at the table feel like it is Christmas. Every single person who tries this pie asks for the recipe before the night is over.
Ingredients for Eggnog Pie Recipe
You only need a handful of easy-to-find, seasonal ingredients for this recipe. Everything is available at any regular grocery store during the holiday season and most of it is probably already in your kitchen.
What You'll Need
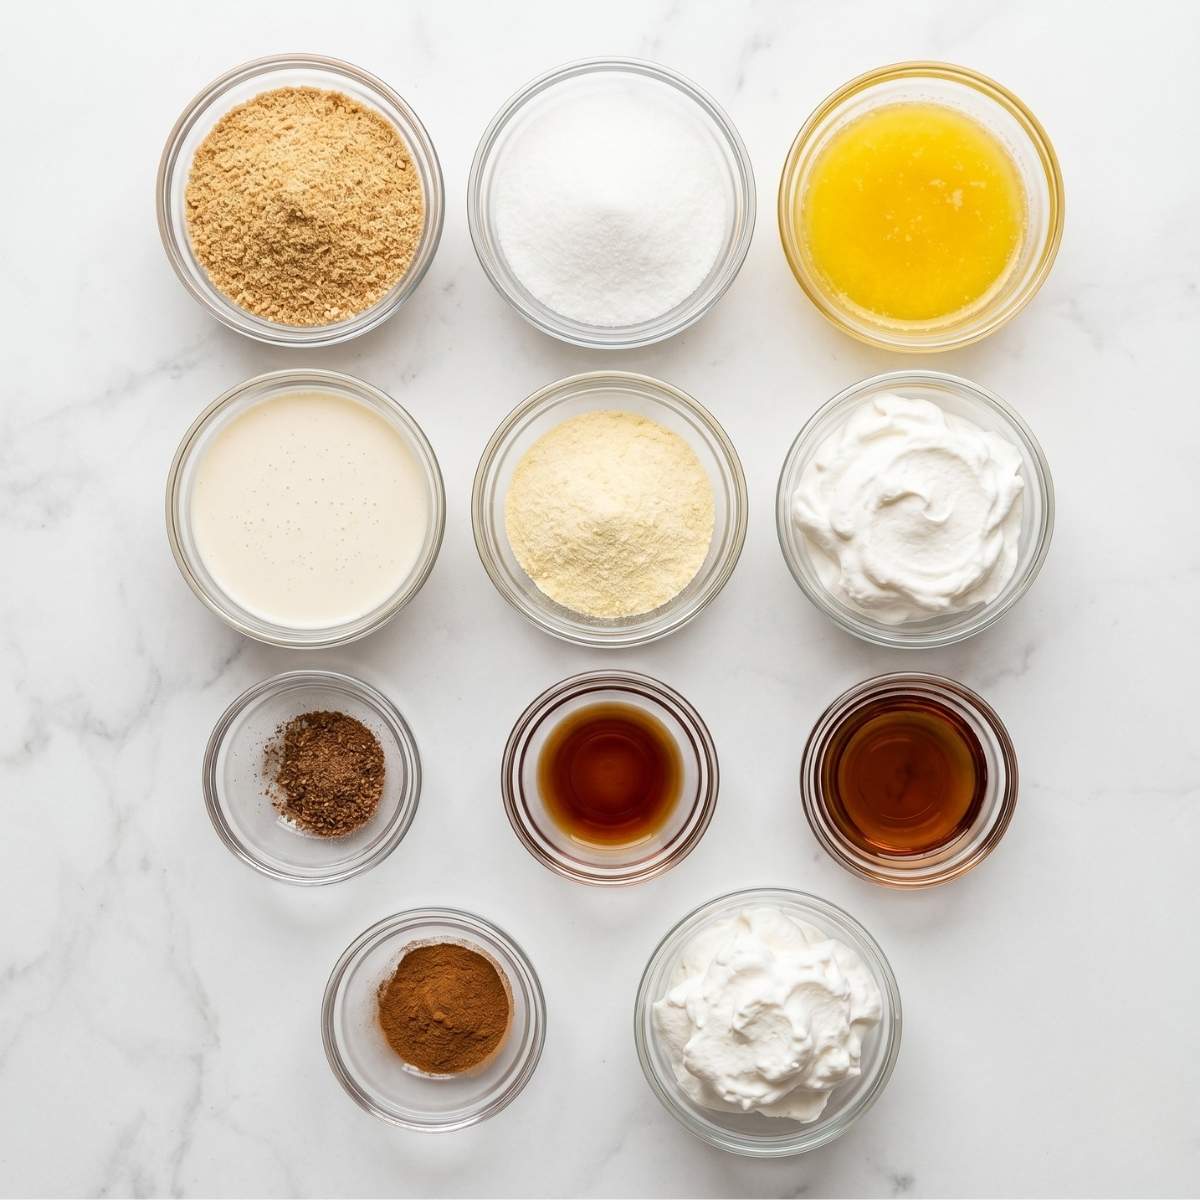
For the graham cracker crust:
- 2 cups graham cracker crumbs (about 14 to 16 full sheets)
- ⅓ cup granulated sugar
- ½ cup unsalted butter, melted
For the eggnog pie filling:
- 2 cups store-bought eggnog (full-fat for the best flavor and texture)
- 1 package (3.4 ounces) instant vanilla pudding mix
- 8 ounces whipped topping, thawed
- ½ teaspoon ground nutmeg (plus extra for garnish)
- ½ teaspoon pure vanilla extract
Optional additions:
- 2 tablespoons dark rum or spiced rum (for an eggnog pie with rum version)
- ¼ teaspoon ground cinnamon
- Extra whipped topping for decorating the top
Why These Ingredients Matter
- Full-fat store-bought eggnog: The quality and fat content of your eggnog makes a significant difference in the final texture and flavor of this pie. Full-fat eggnog has a richer, creamier consistency that sets up beautifully with the instant pudding mix and gives the filling that silky, luscious mouthfeel you want in every slice. Low-fat or light eggnog has a higher water content that can prevent the filling from setting as firmly and results in a slightly loose, less flavorful pie. Buy the good stuff for this one and you will absolutely taste the difference.
- Instant vanilla pudding mix as the setting agent: This is the ingredient that makes this eggnog pie recipe so brilliantly simple. Instant vanilla pudding mixed directly into cold eggnog thickens within minutes into a smooth, creamy, perfectly set filling without any cooking, gelatin, or complicated technique required. The vanilla flavor in the pudding complements and enhances the eggnog flavor rather than competing with it. Do not substitute cook-and-serve pudding mix as it will not set properly when used without heat.
- Ground nutmeg as the signature spice: Nutmeg is the spice that makes eggnog taste like eggnog and it is the spice that makes this pie taste unmistakably like a holiday dessert. A half teaspoon stirred into the filling and an extra pinch dusted over the top before serving adds a warm, aromatic depth that is instantly recognizable and completely irresistible. Freshly grated nutmeg from a whole nutmeg gives you the most vibrant, complex flavor but pre-ground works beautifully too.
How to Make Eggnog Pie Recipe
Step-by-Step Directions
- Make the graham cracker crust. Add the graham cracker crumbs and granulated sugar to a medium bowl and stir together until evenly combined. Pour in the melted butter and mix until every crumb is coated and the mixture holds together when you press it between your fingers. It should feel like damp sand that clumps together easily.
- Press the crust into the pie dish. Transfer the crumb mixture to a 9-inch pie dish. Use the flat bottom of a measuring cup or glass to press the crumbs firmly and evenly across the bottom and up the sides of the dish. Work the crumbs up the sides in an even layer about ¼ inch thick all the way around. A firmly packed, even crust holds together cleanly when sliced and gives you beautiful, defined edges on every piece.
- Chill the crust. Place the pressed crust in the refrigerator for at least 15 minutes while you prepare the filling. A chilled crust holds its shape much better when the filling is poured in and it sets up more cleanly after the full chilling period. If you want a more stable, slightly crunchier crust, you can bake it at 350°F for 8 minutes and let it cool completely before filling.
- Make the eggnog filling. Pour the cold eggnog into a large bowl. Add the instant vanilla pudding mix, ground nutmeg, and vanilla extract. If you are making the eggnog pie with rum version, add the rum now as well. Beat with a hand mixer on medium speed or whisk vigorously by hand for about 2 minutes until the mixture thickens noticeably and starts to look like a loose pudding. It should coat the back of a spoon at this point and you will see it pulling away from the sides of the bowl slightly as it thickens.
- Fold in the whipped topping. Add the thawed whipped topping to the thickened eggnog mixture. Use a rubber spatula to fold it in gently with slow, deliberate strokes from the bottom of the bowl upward. Do not stir aggressively or beat it in with the mixer. Folding gently preserves the air in the whipped topping and gives the filling that light, mousse-like, creamy fluffy texture that makes this pie so special. Fold until just combined with no white streaks remaining.
- Pour and smooth the filling. Pour the eggnog filling into the chilled graham cracker crust. Use an offset spatula or the back of a spoon to smooth the top into an even, level layer. Take a moment to push the filling gently into the edges and corners of the crust so there are no gaps between the filling and the crust walls.
- Garnish and chill. Dust the top of the pie generously with additional ground nutmeg and a light sprinkle of ground cinnamon if using. Cover loosely with plastic wrap, making sure the plastic does not touch the surface of the filling, and refrigerate for at least 4 hours. Overnight chilling gives you the cleanest slices and the most fully developed flavor.
- Slice and serve cold. Remove from the fridge, add any additional whipped topping decoration if desired, dust with one final sprinkle of fresh nutmeg, and slice with a sharp knife wiped clean between each cut for the most beautiful, defined slices.
Hint: For the cleanest, sharpest slices, dip your knife in hot water and wipe it dry before every single cut. The warm blade glides through the cold, creamy filling and the graham cracker crust without dragging or crumbling either layer. It is the same technique professional pastry chefs use and it makes every slice look genuinely beautiful on the plate.
If you love simple no-bake holiday desserts, my no-bake blueberry delight layered dessert uses the exact same creamy, layered approach and is another recipe that always earns serious compliments at a gathering.
My Top Tips For Eggnog Pie Recipe
Use cold eggnog straight from the fridge when you mix it with the instant pudding. Warm or room temperature eggnog will not activate the pudding mix properly and the filling will set too slowly, resulting in a looser texture that does not slice cleanly. Cold eggnog plus instant pudding mix creates that thick, spoonable filling within about 2 minutes of mixing and sets up into a perfectly sliceable pie after the full chill time.
Gold Tip: Make this eggnog pie recipe the night before you plan to serve it. An overnight chill gives the nutmeg and vanilla flavors time to fully bloom and meld into the creamy filling in a way that four hours simply cannot replicate. The texture also sets more completely and gives you those clean, defined slices that make the pie look as good as it tastes. Making dessert the night before is genuinely the smartest holiday cooking strategy I know and this pie proves it every single time.
Little Moments in the Kitchen
The first time I made this eggnog pie recipe, Olivia came into the kitchen mid-assembly, saw the carton of eggnog on the counter, and immediately said, "Are we making eggnog into a pie?" I told her yes and she looked at me like I had just told her we were going to Disneyland. She appointed herself the official nutmeg duster, which she took so seriously that the top of the pie ended up with approximately twice the nutmeg it needed.
I told her it was a little heavy on the spice and she said, very seriously, "More nutmeg means more Christmas, Mom." I did not have a good argument for that so I let it go. She was right, as it turned out, because that pie disappeared faster than anything else on the dessert table that year. She now dusts the nutmeg on every single eggnog pie we make together and always adds extra. I have stopped measuring and just let her go for it.
Substitutions for Eggnog Pie Recipe
- Eggnog pie with cream cheese: Add 4 ounces of softened cream cheese to the mixing bowl with the eggnog and pudding mix. Beat until smooth before folding in the whipped topping. The cream cheese adds a tangy richness and gives the filling a slightly firmer, more cheesecake-like texture that is absolutely wonderful. This is one of my favorite variations of this eggnog pie recipe and it makes the filling taste even more indulgent.
- Eggnog pie with rum: Add 2 tablespoons of dark rum or spiced rum to the filling mixture along with the eggnog and pudding. The rum adds a warm, boozy depth that makes this an adults-only version perfect for holiday dinner parties. Spiced rum works particularly well because its warm vanilla and cinnamon notes complement the eggnog flavor beautifully.
- 3 ingredient eggnog pie: Simplify all the way down to just eggnog, instant vanilla pudding mix, and a store-bought graham cracker crust. Mix the eggnog and pudding together, pour straight into the pre-made crust, and chill for 4 hours. It is the most stripped-down version of this eggnog pie recipe and it is genuinely delicious with almost zero effort.
- Gluten-free crust: Replace the regular graham crackers with gluten-free graham crackers or crushed gluten-free shortbread cookies at a 1:1 ratio. The filling itself is naturally gluten-free so this swap makes the entire pie suitable for anyone with gluten sensitivity at your holiday table.
Variations on Eggnog Pie Recipe
Old Fashioned Eggnog Pie Recipe with Baked Custard Filling
For a baked version that is closer to the old fashioned eggnog pie recipe that grandmothers have been making for generations, whisk together 3 large eggs, 2 cups of full-fat eggnog, ⅓ cup of sugar, 1 teaspoon of vanilla, and ¼ teaspoon of salt until smooth. Pour into a par-baked 9-inch pie crust and bake at 350°F for 45 to 50 minutes until the custard is just set with a slight wobble in the very center. Let it cool completely and refrigerate for at least 2 hours before serving. This baked version has a silkier, denser texture than the no-bake version and tastes deeply eggy and rich in the most classic, traditional way.
Eggnog Pie No Bake with Spiced Rum Caramel Drizzle
Make the standard no-bake eggnog pie filling as written and chill completely. Just before serving, warm 3 tablespoons of store-bought caramel sauce with 1 tablespoon of spiced rum in a small saucepan over low heat until just pourable. Drizzle generously over the top of the chilled pie and finish with a fresh dusting of nutmeg and a sprinkle of flaky sea salt. The salted rum caramel against the creamy, spiced eggnog filling is an absolutely stunning holiday flavor combination that looks and tastes completely impressive. My homemade lemon truffles no bake dessert are another no-bake holiday treat that pairs beautifully on the same dessert table as this pie.
Eggnog Pie with Gingersnap Crust
Swap the graham cracker crust for a gingersnap crust by substituting 2 cups of finely crushed gingersnap cookies for the graham crackers and reducing the sugar to 2 tablespoons since gingersnaps are already sweetened. The warm, spicy ginger crust against the creamy, nutmeg-spiced eggnog filling is an incredible holiday flavor combination that feels a little more sophisticated and unexpected without any extra work. This is the version I bring to holiday gatherings when I want the pie to feel a little more special alongside all the other desserts on the table.
Equipment For Eggnog Pie Recipe
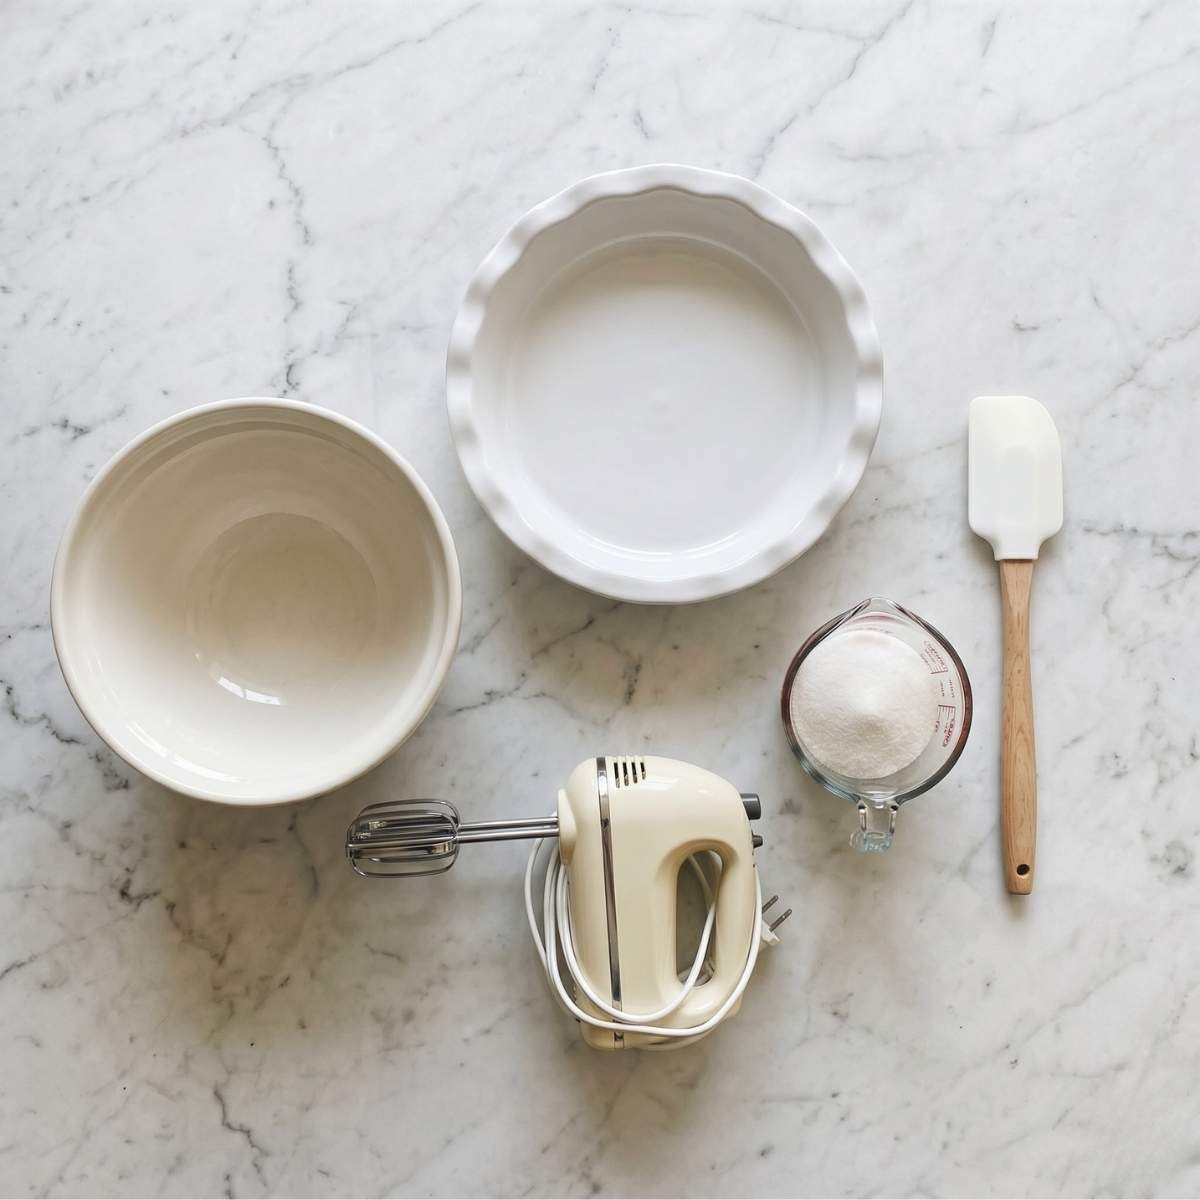
- 9-inch pie dish: The standard size for this recipe. A glass pie dish is my preference because you can see the crust from the side when slicing and serving, and it heats evenly if you choose to bake the crust for extra stability. A ceramic pie dish works beautifully too and looks gorgeous on a holiday table.
- Large mixing bowl: For beating the eggnog and pudding together and folding in the whipped topping. You need enough room to fold without the filling splashing over the sides, so use a larger bowl than you think you need.
- Hand mixer or large whisk: For beating the eggnog and pudding mixture together until thickened. A hand mixer takes about 2 minutes on medium speed. A whisk takes about 3 to 4 minutes of vigorous stirring by hand. Both work perfectly well.
- Rubber spatula: For folding the whipped topping into the filling gently and for smoothing the filling into the crust. The flexible edge of a rubber spatula gets into the curves of the bowl and the pie dish better than any other tool and helps you fold without deflating the filling.
- Measuring cup or flat-bottomed glass: For pressing the graham cracker crust firmly and evenly into the dish and up the sides. The flat bottom creates a compact, uniform crust that holds together cleanly when sliced.
Storage Tips for Eggnog Pie Recipe
- Fridge: This is genuinely the best way to store this pie and the method I always recommend. Cover the finished eggnog pie loosely with plastic wrap and keep it in the refrigerator for up to 4 days. The filling stays set, the crust stays firm, and the flavor keeps developing the longer it sits. Keep it cold right up until you are ready to serve since the whipped topping filling softens quickly once it warms up.
- Serving from the fridge: Pull the eggnog pie out of the refrigerator no more than 15 to 20 minutes before you slice and serve it. Any longer at room temperature and the filling starts to soften and lose that clean, defined slice structure that makes it look so beautiful. Cold is absolutely the right serving temperature for this pie.
- A note on freezing: I honestly do not recommend freezing this eggnog pie recipe and here is why. Cream-based pudding pies do not freeze well. The whipped topping layer separates when frozen and thawed, the pudding filling can turn grainy and watery, and the graham cracker crust often goes soft and crumbly. The texture you worked to create simply does not survive the freeze-thaw process well. Since this pie keeps perfectly in the fridge for up to 4 days and takes only 15 minutes to make, my strong recommendation is to make it fresh within a day or two of when you plan to serve it rather than relying on the freezer.
- Make-ahead tip: This pie is one of the best make-ahead holiday desserts in my entire recipe collection. Make it up to 2 days ahead, cover it, and keep it in the fridge. The flavor peaks at around the 18 to 24 hour mark when all the spices and eggnog have had time to fully settle into the creamy filling.
Olivia's Tip for Eggnog Pie Recipe
Olivia says the nutmeg on top is the most important part and you should never be shy about it. "Dust it like you mean it, Mom. A light sprinkle is not enough." She also says this pie is best eaten with a big dollop of extra whipped topping on each slice even though it is already creamy inside, because in her words, "more whipped cream makes everything better." She is one hundred percent correct and I have stopped arguing with her dessert instincts entirely.
FAQ About Eggnog Pie Recipe
What is an old fashioned eggnog pie recipe?
The old fashioned eggnog pie recipe is a baked custard version made with eggs, sugar, full-fat eggnog, and vanilla poured into a traditional pastry crust and baked slowly at 350°F until just set. It has a silky, dense, egg-rich texture similar to a classic custard pie. This style predates the modern no-bake version and has a deeper, more eggy flavor that many people prefer for a traditional holiday table.
What are common eggnog mistakes?
The most common mistakes when making an eggnog pie recipe are using low-fat eggnog (which prevents proper setting), using cook-and-serve pudding instead of instant (which will not thicken without heat), beating the whipped topping in too aggressively (which deflates the filling), and not chilling the pie long enough before slicing (which results in filling that runs rather than holds a clean edge). All of these are easy to avoid once you know to watch for them.
Which pie is best for diabetics?
A more diabetes-friendly version of this eggnog pie can be made using sugar-free instant vanilla pudding, a smaller amount of eggnog blended with unsweetened almond milk, and a sugar-free whipped topping. The crust can be made with crushed nuts and a small amount of butter for a lower-carb base. Always work with your doctor or a registered dietitian for dietary guidance specific to your personal health needs.
What can I substitute for eggnog in this pie?
A combination of whole milk or half and half with a teaspoon of vanilla extract, a pinch of nutmeg, and a pinch of cinnamon makes a reasonable substitute in the filling. The flavor will be milder and less distinctly eggnog-flavored but still delicious and creamy. For the closest flavor match, add a small amount of rum extract along with the spices to get that signature holiday warmth that makes this eggnog pie recipe so special.
Conclusion
This eggnog pie recipe is the holiday dessert that makes people genuinely excited the moment they see it on the table. It is creamy, warmly spiced, completely no-bake, and one of the easiest impressive desserts you can add to your Christmas or Thanksgiving spread. Once you make it once, it becomes a tradition that the whole family looks forward to every single year.
Make it the night before your next holiday gathering and let it chill overnight for the best possible result. And if you are building out your full holiday dessert table, my eggnog snickerdoodle thumbprint cookies recipe and Christmas gooey butter cookies are both perfect companions alongside this pie. For another classic take on this recipe, I really enjoy this version over at Allrecipes as a great holiday baking reference. Happy cooking, friends!
Related
Looking for other recipes like this? Try these:

Pairing
These are my favorite dishes to serve with Eggnog Pie Recipe:


📖 Recipe
Easy Eggnog Pie Recipe (No-Bake & Creamy Holiday Favorite)
Ingredients
Equipment
Method
- Make the Crust: In a medium bowl, Olivia loves helping me stir together the [graham cracker crumbs] and [granulated sugar]. Then we pour in the [melted butter] and mix until it feels like soft, damp sand. I always tell her this is the "magic texture" that helps the crust hold together.
- Press the Crust: Press the crumb mixture firmly into a 9-inch pie dish. Olivia uses the bottom of a glass to smooth it out, and she takes this job very seriously. Make sure it's even along the bottom and sides for pretty slices later.
- Chill the Crust: Place the crust in the fridge for about 15 minutes. This gives us just enough time to start the filling while it firms up. I always tell Olivia this is the "resting moment" before the fun part.
- Mix the Filling: In a large bowl, whisk together the cold [eggnog], [instant vanilla pudding mix], [ground nutmeg], and [vanilla extract]. Olivia counts to two minutes while we mix, it thickens right before your eyes into a creamy pudding.
- Fold in Whipped Topping: Gently fold in the [whipped topping] using a spatula. I always remind Olivia to go slow, this is how we keep it light and fluffy like a cloud. No rushing this step!
- Fill the Pie: Pour the creamy filling into the chilled crust and smooth the top. Olivia always sneaks a tiny taste here and calls it "quality control." Make sure the top is nice and even.
- Garnish & Chill: Sprinkle extra [nutmeg] on top, Olivia insists "more nutmeg means more Christmas." Cover loosely and refrigerate for at least 4 hours or overnight for best results.
- Slice & Serve: Slice the pie cold using a warm knife for clean cuts. Add a little extra whipped topping if you like. This is always the moment Olivia smiles the biggest, it means dessert is ready.
Nutrition
Notes
- For a richer version, add 4 oz cream cheese to the filling before folding in whipped topping.
- You can make this pie up to 2 days ahead, it actually tastes better the next day.
- Avoid freezing; the texture won't hold up well after thawing.
- For a gluten-free option, use gluten-free graham crackers.
- Serve with extra whipped topping or a sprinkle of cinnamon for a cozy holiday touch.

Leave a Reply