Some nights, you just crave that perfect, crunchy exterior and savory filling of a restaurant favorite. This Crispy Beef and Cheese Chimichangas recipe is our way of getting those flavors right at home. It's a fun, surprisingly simple recipe that gives you all the deliciousness of a classic dish without ever leaving your kitchen.
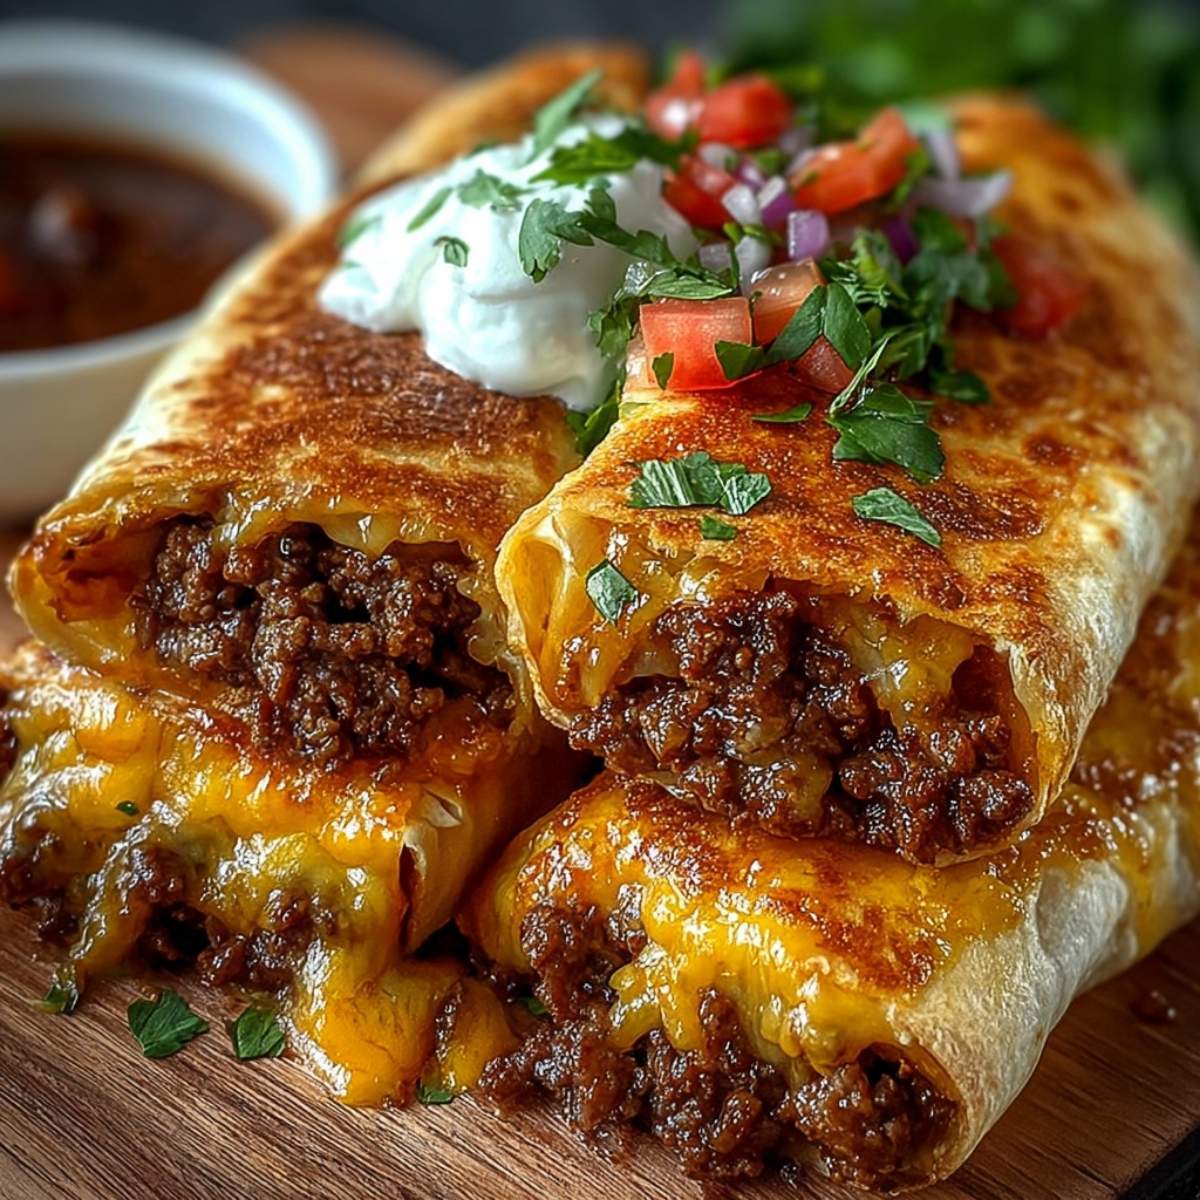
Easy beef chimichangas recipe with shredded beef, refried beans, and tons of melty cheese creates the ultimate comfort food. Beef and cheese chimichangas are made with large tortillas, and filled with savory beef, beans, and cheese that get sealed up and cooked until that golden shell is perfectly crispy. The best part? These tasty beef and bean treats are baked instead of fried, making them a bit lighter without sacrificing any of that incredible crunch in this crispy beef and cheese chimichangas recipe.
Jump to:
- Why You'll Love This Crispy Beef and Cheese Chimichangas Recipe
- Ingredients for Crispy Beef and Cheese Chimichangas
- How to Make Crispy Beef and Cheese Chimichangas
- My Top Tips for This Recipe
- Little Moments in the Kitchen
- Substitutions for Crispy Beef and Cheese Chimichangas
- Variations on Crispy Beef and Cheese Chimichangas
- Equipment for Crispy Beef and Cheese Chimichangas
- Storage Tips for Crispy Beef and Cheese Chimichangas
- Olivia's Tip for Crispy Beef and Cheese Chimichangas
- FAQ about Crispy Beef and Cheese Chimichangas
- Conclusion
- Related
- Pairing
- 📖 Recipe
Why You'll Love This Crispy Beef and Cheese Chimichangas Recipe
Outstanding things happen when you take the flavors of a burrito and give them a crispy golden exterior, and here's why this crispy beef and cheese chimichangas recipe has become our Tex-Mex favorite:
- Perfectly crispy without deep frying - These chimichanga beef and cheese beauties get that gorgeous golden shell in the oven or air fryer. No messy oil required for this beef and cheese chimichanga in air fryer method that makes crispy beef cheese chimichangas so easy.
- Incredibly versatile - Serve as a main dish with rice and beans, cut into pieces for appetizers, or wrap up for easy lunches. These beef and cheese chimichanga recipes work for any occasion.
- Family-friendly flavors - The combination of seasoned ground beef, refried beans, and melty cheese appeals to everyone. Perfect for picky eaters who love tacos and burritos in this beef and cheese chimichangas recipe.
Ingredients for Crispy Beef and Cheese Chimichangas
Building this how to make beef and cheese chimichangas starts with quality ingredients that create those authentic Tex-Mex flavors. Chimichangas are tortillas filled with beef, onions, and spices, and rolled tight to seal in all that deliciousness in these crispy beef & cheese chimichangas.
What You'll Need
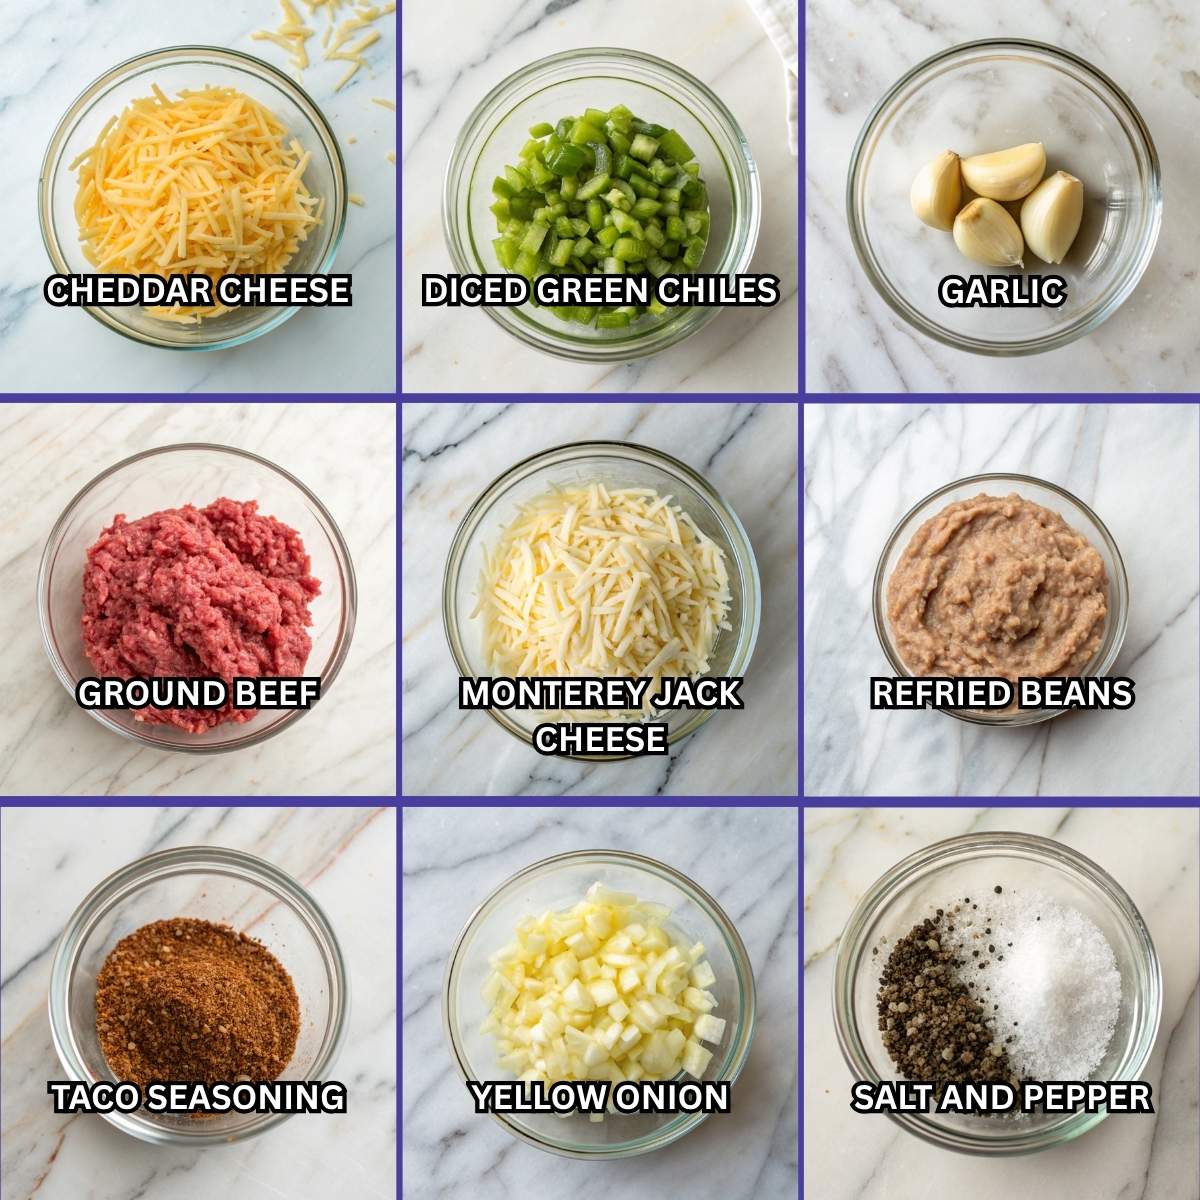
For the Filling:
- Ground beef (1.5 lbs)
- Yellow onion (1 medium, diced)
- Garlic (3 cloves, minced)
- Taco seasoning (2 tablespoons)
- Refried beans (1 can, 16 oz)
- Shredded cheddar cheese (2 cups)
- Shredded Monterey Jack cheese (1 cup)
- Diced green chiles (1 small can, 4 oz)
- Salt and pepper

For Assembly:
- Large flour tortillas (8-10 inch, 8 tortillas)
- Vegetable oil or cooking spray
- Butter (melted, 2 tablespoons, optional)
For Serving:
- Sour cream
- Guacamole
- Salsa
- Pico de gallo
- Shredded lettuce
- Diced tomatoes
- Spanish rice
- Cilantro
Why These Ingredients Matter
- Ground beef provides the hearty base - Seasoned ground beef creates that classic chimichanga flavor that everyone loves. The beef gets perfectly browned and absorbs all the spices in this cheesy beef chimichanga recipe.
- Two cheeses create perfect meltiness - Combining cheddar and Monterey Jack gives you both sharp flavor and smooth melting. This is what makes the cheese center so incredibly gooey in these beef and cheese chimichangas preparations.
- Refried beans add essential texture - They help bind the filling together and add that authentic Mexican food flavor. The beans prevent the filling from being too loose inside the crispy shell of this beef and cheese chimichanga recipe.
How to Make Crispy Beef and Cheese Chimichangas
Step-by-Step Directions
- Cook the beef. In a large skillet over medium-high heat, brown 1.5 lbs ground beef with diced onion. Break up the meat as it cooks. Drain excess fat.
- Season the filling. Add minced garlic and taco seasoning to the beef. Cook for 1-2 minutes until fragrant. Season with salt and pepper.
- Add beans and cheese. Stir in refried beans, green chiles, and 1 cup of the shredded cheese. Mix until well combined and cheese melts. Remove from heat.
- Prep your workspace. Preheat oven to 425°F. Line a large baking sheet with parchment paper. Have your tortillas, filling, and remaining cheese ready.
- Warm tortillas. Microwave tortillas for 20-30 seconds to make them pliable. This prevents cracking when you roll them.
- Fill the tortillas. Place about ½ cup filling in the center of each tortilla. Add a generous handful of the remaining cheese on top for these crispy beef and cheese chimichangas.
- Fold and seal. Fold the sides in first, then roll from the bottom up tightly. Place seam-side down on the prepared baking sheet. This folding and sealing technique keeps everything inside.
- Brush with oil. Spray or brush the tops and sides with oil. This creates that golden shell we're after. You can also brush with melted butter for extra richness.
- Bake until golden. Bake for 20-25 minutes, flipping halfway through, until golden brown and crispy on all sides for perfect crispy beef cheese chimichangas.
- Serve immediately. Let rest for 5 minutes, then serve with your favorite toppings like sour cream, guacamole, and salsa.
Hint: Don't overfill your chimichangas or they'll burst open while baking - less is more when it comes to the filling!
My Top Tips for This Recipe
Mastering this best crispy beef and cheese chimichangas comes down to getting them properly sealed. Make sure to roll them tightly and place them seam-side down on the baking sheet so they stay closed while cooking in this beef and cheese chimichangas recipe method.
Gold Tip: For extra crispy chimichangas, flip them twice during baking and brush with additional oil after each flip. This ensures every side gets that gorgeous golden color and maximum crunch in this mexican dinner favorite, creating the ultimate beef and cheese chimichanga recipe results.
Little Moments in the Kitchen
Last weekend when I was making these easy crispy beef and cheese chimichangas for dinner, Olivia got excited about the rolling process. "Mom, it's like wrapping presents but the present is cheese and beef!" she exclaimed, carefully folding the sides in like I'd shown her. I explained how proper sealing keeps all the melty goodness inside while it bakes, just like how we fold our bang bang chicken bowl wraps tight to keep the sauce from leaking.
When she took her first bite after they came out of the oven, she got cheese all over her chin and declared, "This is way better than the restaurant kind - it's so crunchy!" Now she insists on being the official "chimichanga roller" in our house, taking her job very seriously. She's even started rating each one on crispiness level, calling the extra golden ones her "premium crispy deluxe chimichangas" in this crispy beef & cheese chimichangas adventure.
Substitutions for Crispy Beef and Cheese Chimichangas
Air Fryer Method - Make beef and cheese chimichangas air fryer style by cooking at 400°F for 10-12 minutes, flipping halfway. They get even crispier with less oil in this beef and cheese chimichanga approach.
Baked Version - These beef and cheese chimichangas baked in the oven are already a healthier option than traditional fried. The recipe above is the baked method for perfect crispy beef and cheese chimichangas.
Keto Option - Use low-carb tortillas and skip the beans for beef and cheese chimichangas keto that fit your macros. Add extra cheese to keep them substantial.
Bean and Cheese - Make these beef bean and cheese chimichangas by increasing the beans and reducing the beef for a more budget-friendly version of this cheesy beef chimichanga recipe.
Variations on Crispy Beef and Cheese Chimichangas
Shredded Beef Style - Use slow-cooked shredded beef instead of ground beef for a different texture. Perfect for using leftover pot roast in this crisp beef burrito taco time inspired version.
With Cheese Sauce - Make beef chimichangas with cheese sauce by serving with warm queso drizzled over the top for ultimate indulgence in these beef and cheese chimichangas.
Breakfast Version - Fill with scrambled eggs, breakfast sausage, cheese, and potatoes for morning chimichangas that are incredible variations of this beef and cheese chimichanga recipe.
Steak Chimichangas - Use seasoned steak strips instead of ground beef for a steak chimichanga recipe that's more upscale than traditional crispy beef cheese chimichangas.
Vegetarian Option - Skip the meat and load up with extra beans, rice, peppers, and cheese for a meat-free version that's still hearty.
These satisfying Tex-Mex classics pair perfectly with other bold flavors and work wonderfully alongside our sweet hawaiian crockpot chicken when you want both Mexican and tropical dinner options!
Equipment for Crispy Beef and Cheese Chimichangas
Large skillet - Essential for browning the beef and building the flavorful filling. A 12-inch skillet gives you room to work on this beef and cheese chimichangas recipe.
Large baking sheet - You need space to arrange all the chimichangas without them touching. Use two sheets if making a double batch of these burritos recipe favorites.
Parchment paper - Prevents sticking and makes cleanup easier. These homemade chimichangas slide right off after baking for perfect crispy beef and cheese chimichangas.
Pastry brush - Perfect for brushing oil or melted butter on the tortillas for that golden brown color in these mexican food recipes authentic style beef and cheese chimichanga preparations.
Storage Tips for Crispy Beef and Cheese Chimichangas
Refrigerator storage - Store baked chimichangas in airtight containers for up to 3 days. They lose some crispiness but reheat well in these beef dishes and crispy beef cheese chimichangas.
Freezing before baking - Assemble, wrap individually in plastic wrap, then freeze for up to 3 months. Bake from frozen, adding 5-10 minutes to cook time for this beef and cheese chimichangas recipe.
Reheating for crispiness - Reheat in the oven at 375°F for 10-15 minutes to restore the crispy exterior. Microwave makes them soggy in these ground beef chimichanga recipe preparations.
Meal prep friendly - Make the filling ahead and store separately. Assemble and bake fresh when ready to eat for best results in these beef dinner options and cheesy beef chimichanga recipe variations.
These crowd-pleasing Mexican favorites work beautifully for game day gatherings and pair perfectly with other comfort foods like our hawaiian chicken sheet pan when you want variety at your next potluck!
Olivia's Tip for Crispy Beef and Cheese Chimichangas
"Don't put too much filling in like I did the first time - mine exploded! Also, the corner pieces are the crispiest, so fight your brother for those ones!"
FAQ about Crispy Beef and Cheese Chimichangas
What is the best cheese for chimichangas?
A combination of cheddar and Monterey Jack cheese works best. Cheddar provides sharp flavor while Monterey Jack melts smoothly. You can also use Mexican blend cheese or pepper jack for extra heat in these chimichanga recipe variations and crispy beef & cheese chimichangas.
What is the filling of a chimichanga?
Traditional chimichanga filling includes seasoned meat (usually beef or chicken), refried beans, cheese, and sometimes rice. The filling should be thick enough to stay inside the tortilla when rolled and not make the tortilla soggy in this beef and cheese chimichanga.
What kind of meat is best in a chimichanga?
Ground beef is most popular, but shredded beef, chicken, or pork also work excellently. Ground beef is easiest and most budget-friendly, while shredded meats provide a more authentic texture in these mexican chimichanga recipe preparations and beef and cheese chimichangas recipe.
What is in a beef chimichanga?
A beef chimichanga contains seasoned ground beef, refried beans, cheese (usually cheddar and Monterey Jack), onions, garlic, and spices like cumin and chili powder. It's wrapped in a flour tortilla and cooked until crispy on the outside for perfect crispy beef and cheese chimichangas.
Conclusion
There's nothing quite as satisfying as recreating a restaurant favorite in your own home, and these Crispy Beef and Cheese Chimichangas are proof of that. They're crunchy, cheesy, and just plain delicious. We hope they bring as much joy to your family dinner as they do to ours.
Amazing results happen when you take the time to properly seal your chimichangas and bake them until they're perfectly golden. This works beautifully for family dinners, game day parties, or whenever you want impressive Tex-Mex flavors with reasonable effort. They pair perfectly with other crowd-pleasers like our cowboy butter chicken linguine when you want both Mexican and Italian options on your menu. If you love baked Mexican food, you might also enjoy these baked chicken chimichangas that take the chimichanga concept in a lighter direction with chicken and rice.
Jasmine & Olivia💛
Related
Looking for other recipes like this? Try these:


Pairing
These are my favorite dishes to serve with Beef and Cheese Chimichangas:


📖 Recipe
Easy Crispy Beef and Cheese Chimichangas
Ingredients
Equipment
Method
- In a large skillet over medium-high heat, brown the [ground beef] with the [diced yellow onion]. I love getting Olivia to help me break up the meat with a wooden spoon-it's her favorite job! Once the meat is browned, drain any excess fat
- Stir in the [minced garlic] and [taco seasoning]. Cook for 1-2 minutes until you can really smell that amazing aroma. Season with a little [salt and pepper] to taste. This is where we get all that classic flavor
- Reduce the heat and stir in the [refried beans], [diced green chiles], and 1 cup of the [shredded cheddar cheese]. Mix until everything is well combined and the cheese is beautifully melted. Now the filling is ready to go!
- Preheat your oven to 425°F (220°C). Line a large baking sheet with parchment paper. This step is a big-time saver for cleanup later, which is something I'm always grateful for
- Time for Olivia's favorite part-the rolling! First, warm the [flour tortillas] in the microwave for 20-30 seconds to make them soft. Place about ½ cup of filling in the center of each tortilla, then top with a generous handful of the remaining [shredded cheddar cheese] and [shredded Monterey Jack cheese]
- To seal, fold the sides of the tortilla in first, then roll it tightly from the bottom up. Make sure the seam side is down on the prepared baking sheet so they don't unroll. This is the secret to keeping all that melty goodness inside
- Lightly brush the tops and sides of each chimichanga with [vegetable oil]. This is what gives them that incredible crispy, golden-brown shell. Bake for 20-25 minutes, flipping them halfway through, until they are perfectly golden
- Let the chimichangas rest for about 5 minutes, then serve them with your favorite toppings like [sour cream], [guacamole], and [salsa]. Watching Olivia enjoy these, with a little cheese on her chin, is my absolute favorite part
Nutrition
Notes
- Make it Lighter: For a lighter option, use lean ground turkey instead of ground beef.
- Air Fryer Method: To make these in the air fryer, cook at 400°F (200°C) for 10-12 minutes, flipping halfway. They get incredibly crispy this way!
- Make Ahead: You can assemble the chimichangas and store them in the fridge for up to 24 hours before baking. Just add a few extra minutes to the bake time.
- Freezing Instructions: Assemble the chimichangas, but don't bake them. Wrap each one tightly in plastic wrap and then aluminum foil, and freeze for up to 3 months. To cook, bake from frozen, adding 10-15 minutes to the cook time.


Leave a Reply